![How to Fix Fatal Device Hardware Error Easily and Quickly [Full Guide]](https://i0.wp.com/behindthescreen.fr/wp-content/uploads/2024/01/How-to-Fix-Fatal-Device-Hardware-Error-Easily-and-Quickly.jpg?fit=928%2C557&ssl=1 "How to Fix Fatal Device Hardware Error Easily and Quickly [Full Guide]")
A ‘deadly gadget {hardware}’ error in your WD or Seagate exterior onerous drive signifies a {hardware} problem. This drawback usually happens throughout file transfers or OS installations on a malfunctioning inside/exterior storage gadget. You may additionally encounter messages like ‘X: isn’t accessible’ or ‘error 0x800701e’ accompanied by this {hardware} problem.
Nonetheless, in case your drive isn’t bodily broken, you may repair this error by yourself utilizing the options coated on this article. There’s additionally a bonus tip to recuperate misplaced knowledge from the drive with the deadly {hardware} error. So, maintain studying until the tip!
Half 1: Fast Fixes for the Request Failed On account of a Deadly Machine {Hardware} Error
Once you encounter the ‘the request failed resulting from deadly gadget {hardware}’ error, first carry out some primary checks. It would simply prevent a while. Right here they’re:
Repair 1: Verify the USB Cables and Ports
In case your onerous drive exhibits a ‘deadly {hardware} error has occurred,’ it may be resulting from free connections or defective cables. Be certain that the gadget is linked appropriately, and the cable is comfortable. If connections are free, push them again in firmly.
But when the cable is broken, swap it out for a brand new, high-quality USB cable. Check completely different ports to rule out port points. Additionally, join the drive to a different laptop to verify whether or not the issue is with the PC or the disk.
Repair 2: Verify the Drive’s SMART Standing
To find out if error 0x800701e3 is because of a physically damaged drive and to gauge the problem’s severity, you may study a drive’s SMART attributes. Observe the steps under that can assist you by it:
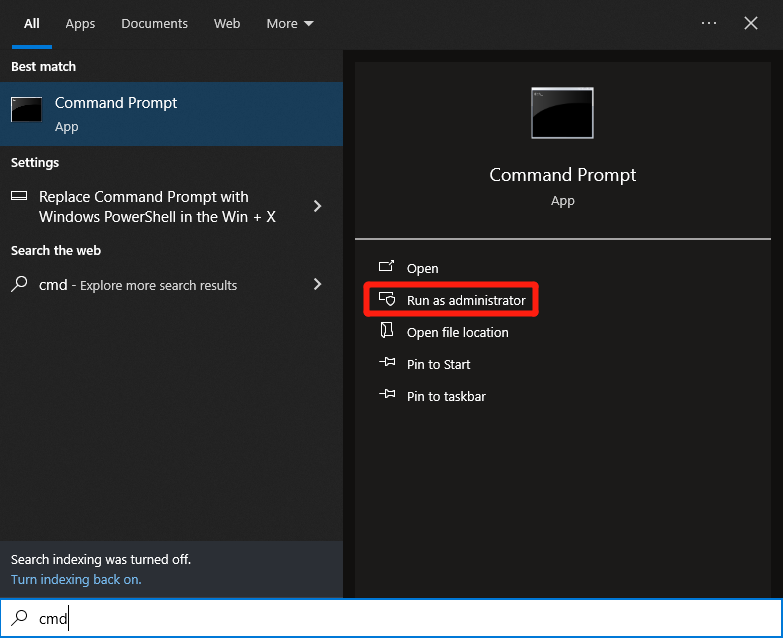
Step 1: Kind “cmd” within the search field, right-click, and open the “Command Immediate” as admin.
Step 2: Kind in “wmic diskdrive get standing” and press “Enter.
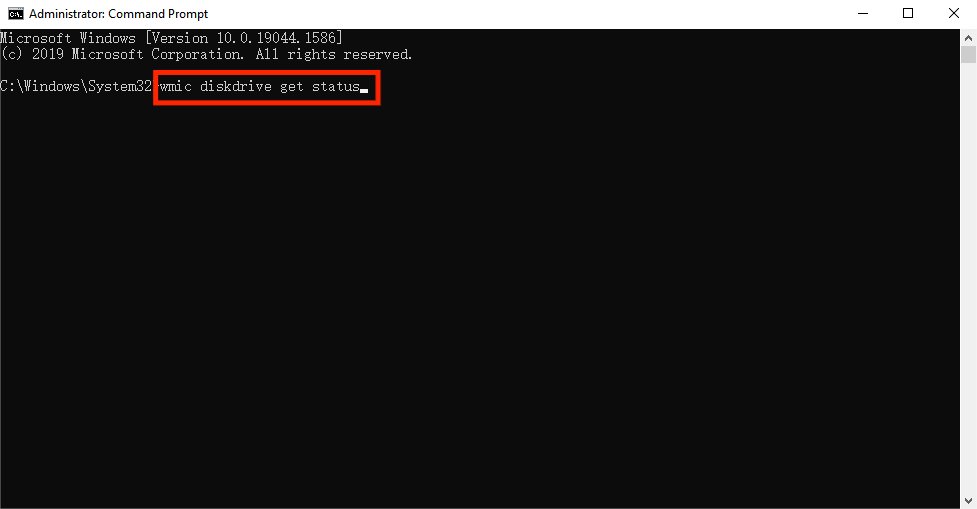
If all the pieces comes again as “OK,” your gadget has no points and isn’t bodily broken. But when the outcomes come again as “Dangerous” or “Warning,” we strongly advise sending your drive for guide restore to repair the ‘deadly gadget {hardware}’ error.
Bonus Tip: Get well Misplaced Information From the Drive With a Deadly Machine {Hardware} Error
As we all know from above, a ‘deadly gadget {hardware}’ error makes the storage gadget inaccessible. If that occurs, this implies you may not entry your knowledge. So, how can we recuperate it? The excellent news is a third-party device like 4DDiG Data Recovery can retrieve knowledge from corrupted, broken, or formatted inside/exterior storage units. Be it audio, movies, paperwork, photographs, or archives, it may well recuperate them no matter their situation. This device gives:
- Retrieve information from misplaced partitions, crashed, unbootable, or virus-infected techniques.
- Get well knowledge from digital cameras, drones, NAS storage, USBs, SD playing cards, onerous disks, and so forth.
- Retrieve completely deleted, inaccessible, unsaved, or hidden information.
- Helps restoration of 2000+ file sorts.
- It gives a excessive restoration price, maintains knowledge integrity, and prevents loss.
- Search filters and classes for focused search and restoration.
- Free model obtainable and simple to make use of.
Take a look at the steps under to make use of this device to recuperate knowledge misplaced out of your drive resulting from ‘the request failed resulting from a deadly gadget {hardware}’ error:
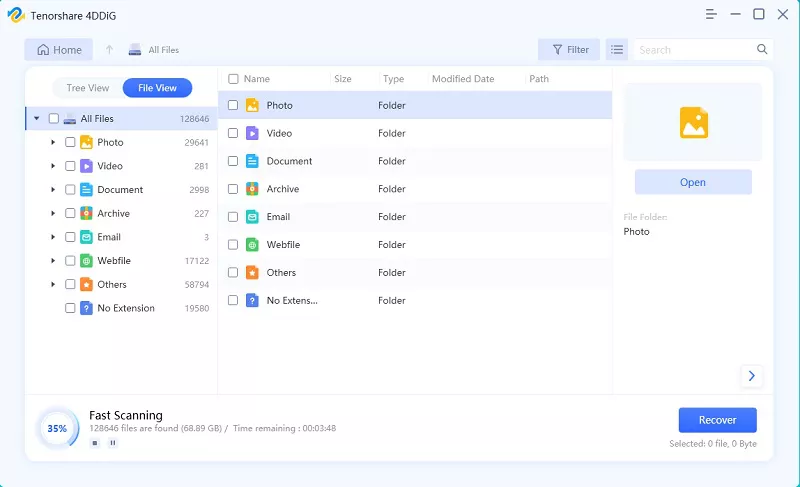
Step 1: Obtain, set up, and launch the device in your PC and select the disk with the deadly {hardware} error. Click on “Begin.” You too can choose goal file sorts earlier than scanning.

Step 2: The device will scan the chosen drive for misplaced knowledge, and you’ll pause or cease the method anytime. You possibly can preview Deleted Information, Misplaced Location, and so forth, within the “Tree View.” Swap to “File View” to verify particular file sorts, or use the search or filter choices to slim your search.
Step 3: As soon as you discover the misplaced information, preview and recuperate them to a secure location. Keep away from saving them to the identical partition to stop overwriting and everlasting knowledge loss.

Half 2: Superior Options for the Request Failed On account of a Deadly Machine {Hardware} Error
Fast fixes won’t at all times resolve the ‘deadly gadget {hardware}’ error. When you’ve recovered knowledge from the problematic disk, should you’re snug with superior tech options, give them a shot.
However remember these strategies might lead to knowledge loss. Nonetheless, should you’ve recovered the info, you may strive them with out worries. Listed below are six options to repair the ‘the request failed resulting from a deadly gadget {hardware}’ error:
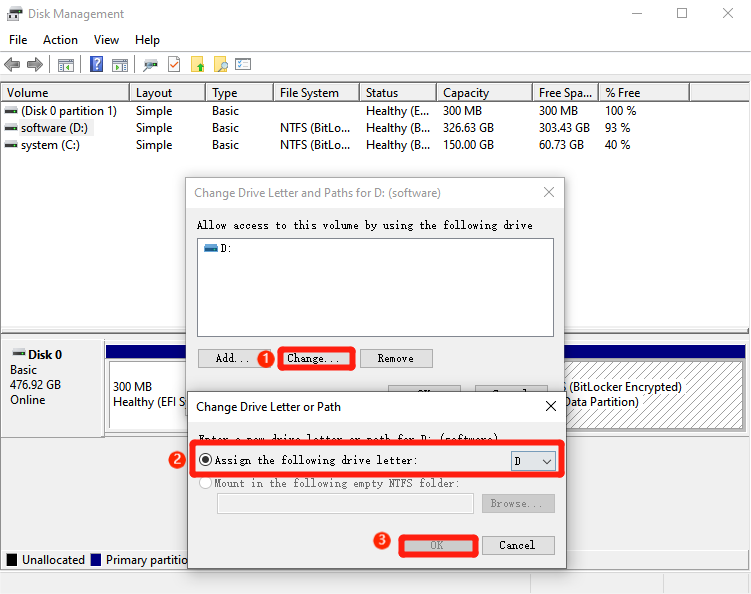
Repair 3: Change the Drive Letter
When the OS tries to entry a storage gadget utilizing a drive letter already assigned to a different gadget, it might lead to a ‘deadly {hardware} error has occurred.’ Though the OS modifications the letter to stop conflicts, generally it fails to take action. If that occurs, you may change the drive letter manually to resolve this problem:
Step 1. Press the “Win + X” keys and right-click on “Disk Administration” to launch it.
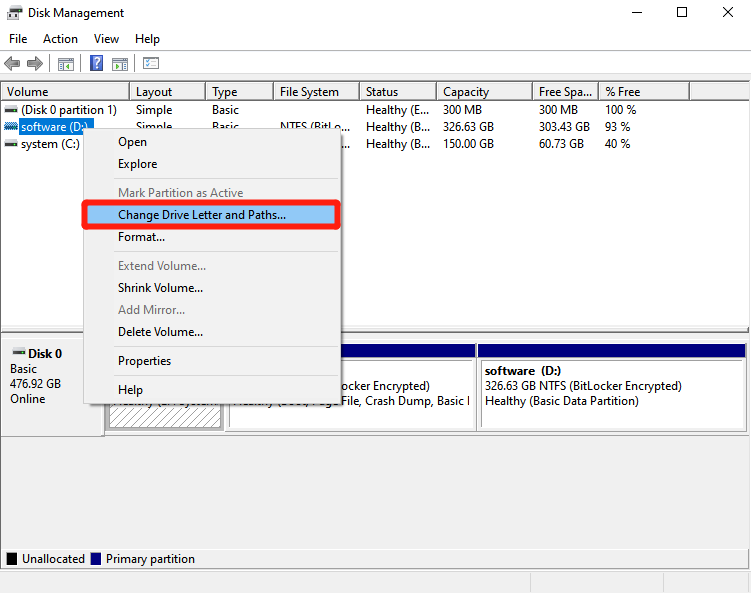
Step 2: Proper-click on the partition whose drive letter you want to change. Select “Change Drive Letter and Paths…,” choose the drive title, and press “Change.”
Step 3: Decide an obtainable drive letter, tick the “Assign the next drive letter” field, and click on “OK” twice.
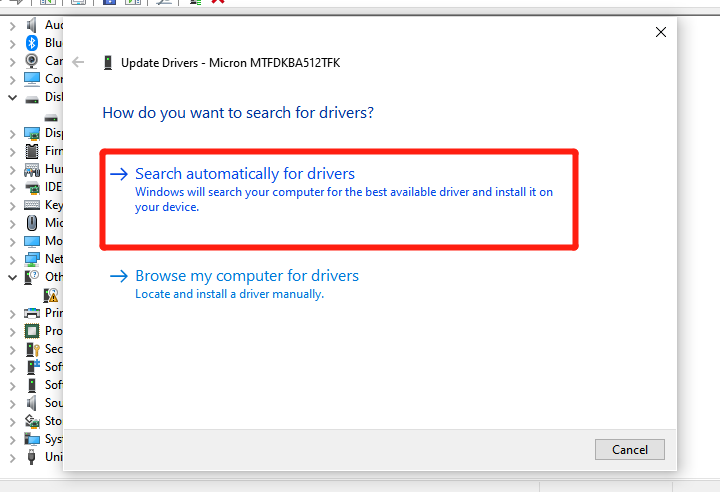
Repair 4: Replace Disk Driver
Replace your disk driver if the ‘the request failed resulting from a deadly gadget {hardware}’ error is brought on by an outdated driver. Right here’s what to do:
Step 1: Maintain the “Win + X” keys and right-click on the “Machine Supervisor” to launch it.
Step 2: Discover your drive, right-click, and decide “Replace Driver.”

Step 3: Go for “Search robotically for up to date driver software program” for Home windows to obtain and set up the driving force robotically.
Repair 5: Run CHKDSK
Dangerous sectors throughout your onerous disk can even result in the ‘‘the request failed resulting from a deadly gadget {hardware}’ error. To examine and repair file system corruption and unhealthy sectors, you may make use of CHKDSK. This device is value a shot for many onerous drive accessibility issues. Right here’s learn how to run it:
Step 1: Kind “cmd” within the search field, right-click, and open the “Command Immediate” as admin.
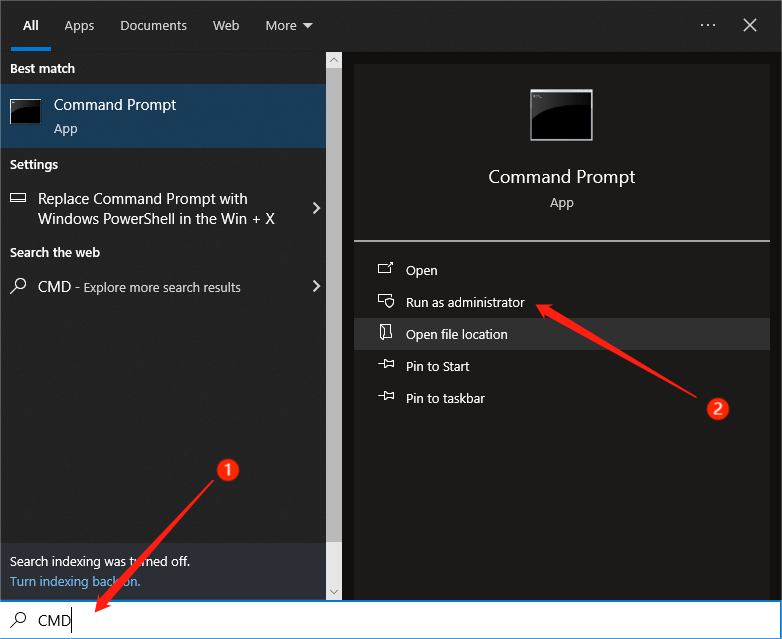
Step 2: Kind “chkdsk F: /f/r” and press “Enter.” Right here, exchange “F” with the drive letter of your disk.
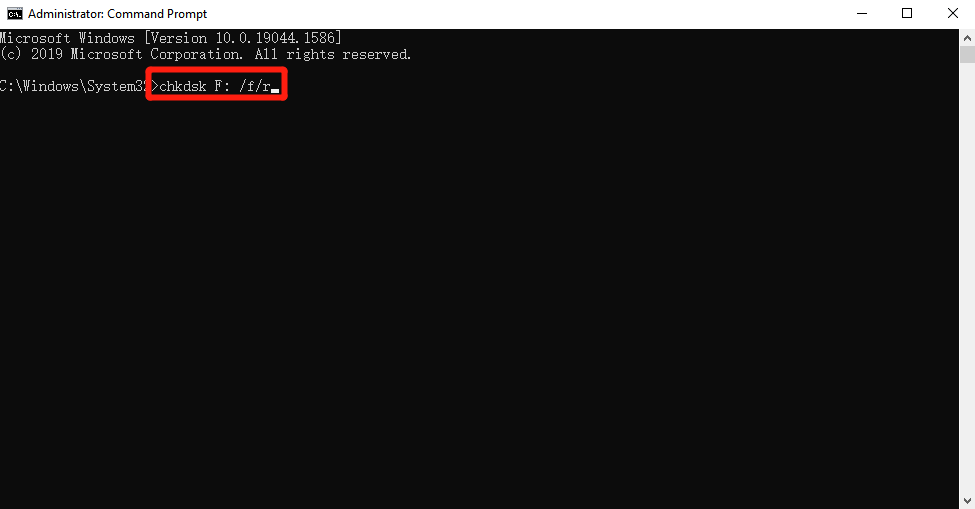
The CHKDSK device will detect any unhealthy sectors and attempt to mend file system errors. However any knowledge in these sectors could also be misplaced except you’ve already recovered it.
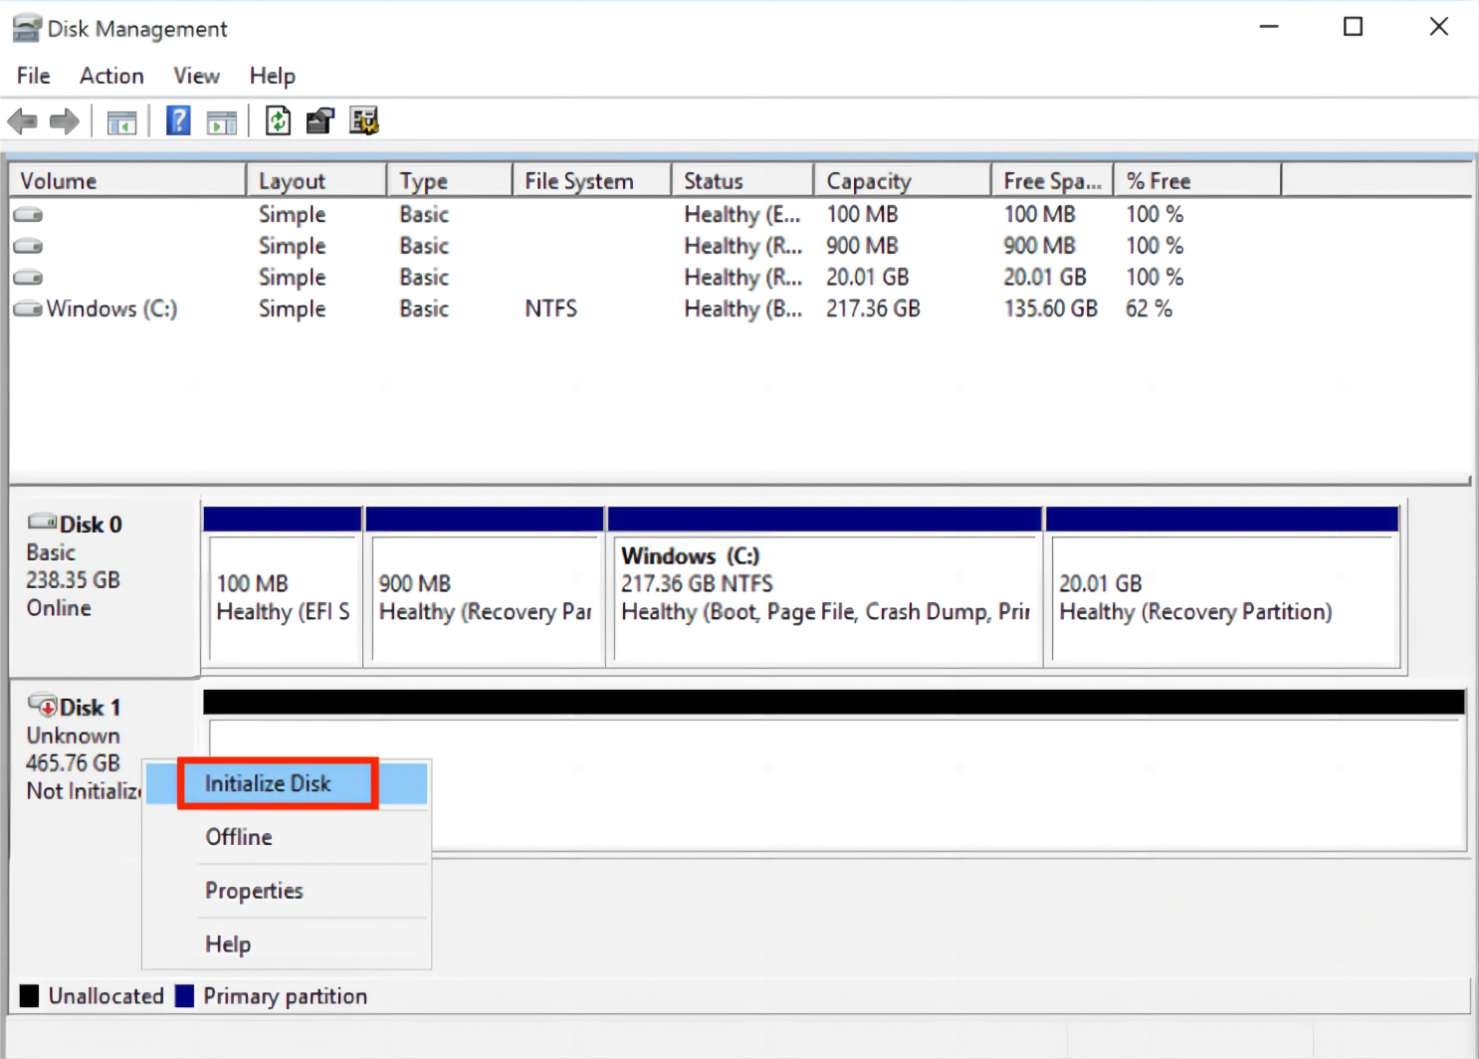
Repair 6: Initialize the Drive
When your drive shows ‘deadly {hardware} error has occurred,’ verify if it seems as “Unknown” in Disk Administration. If sure, go forward and initialize it with the next steps to resolve the deadly {hardware} error:
Step 1: Press the “Win + X” keys and right-click on “Disk Administration” to launch it.
Step 2: Proper-click the disk displaying the {hardware} error and decide “Initialize Disk” or “Unknown & Not Initialized.”
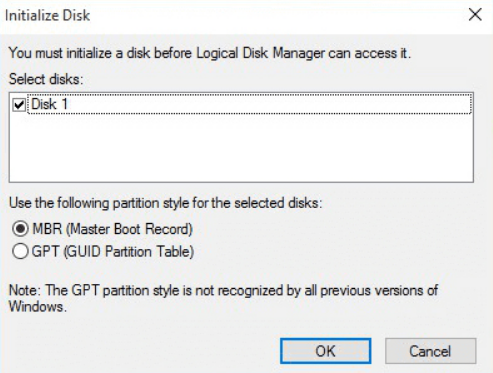
Step 3: Choose the partition fashion (MBR or GPT) for the drive and click on “OK.” As soon as accomplished, create a partition on the disk.
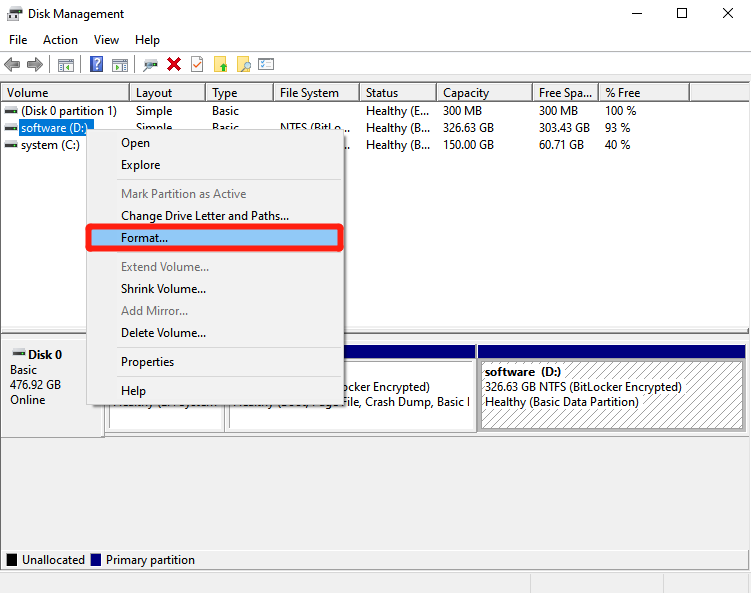
Repair 7: Format the Disk
If not one of the earlier fixes labored, your final choice is to format the onerous drive. It may possibly successfully resolve the ‘error 0x800701e.’ However bear in mind that it wipes out all of your knowledge except you utilize a restoration device like 4DDiG Information Restoration to retrieve it first. Right here’s learn how to format the disk with the {hardware} error in “Disk Administration:”
Step 1: Press the “Win + X” keys and right-click on “Disk Administration” to launch it.
Step 2: Proper-click on the drive with the deadly gadget {hardware} error and choose “Format.”
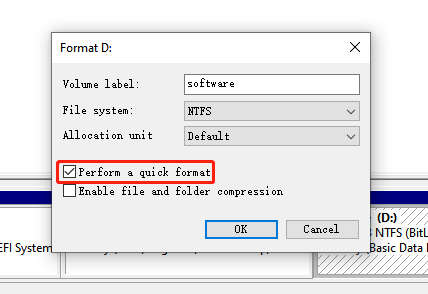
Step 3: Select an appropriate quantity label, file system, and allocation unit dimension (or persist with the system defaults).
Step 4: Verify “Carry out a fast format” and hit “OK” twice to provoke the formatting.
Repair 8: Rent Skilled Companies
In case your disk is bodily broken and you’ll’t repair the ‘deadly gadget {hardware}’ error or retrieve knowledge, it’s greatest to hunt skilled assist. Attain out to your disk {hardware} producer or find an area restore and restoration heart to ship your gadget for decision.
Half 3: Tips on how to Keep Your Onerous Drive Well being?
When you’ve sorted the ‘deadly gadget {hardware}’ error, you may take steps to stop it from occurring once more by sustaining the well being of your disk. Right here’s how:
- Again up your knowledge usually to stop its loss resulting from {hardware} failures, malware, or unintentional deletions.
- Use a disk cleaner to take away pointless information.
- Frequently defragment your onerous drive to spice up its efficiency and lifespan.
- Regulate your onerous drive’s well being utilizing instruments like Onerous Disk Sentinel.
- Guarantee your laptop stays cool to keep away from onerous drive injury from overheating.
- Guard in opposition to energy surges with surge protectors.
The Request Failed On account of A Deadly Machine {Hardware} Error FAQs
Q1: What’s a deadly gadget {hardware} error?
A ‘deadly gadget {hardware}’ error means your laptop can’t entry an exterior disk or onerous drive due to a {hardware} drawback. It occurs when the exterior drive isn’t correctly linked or is dealing with well being points.
Q2: Why does a deadly gadget {hardware} error happen?
A deadly gadget {hardware} problem occurs as a result of following causes:
- USB cable issues.
- Dangerous sectors.
- File system points.
- Unfastened USB connections.
- Bodily injury to the drive.
- There’s a problem with the drive letter.
- Outdated disk drivers.
Conclusion
The ‘deadly gadget {hardware}’ error makes your disk inaccessible. Nonetheless, you may regain management by making an attempt the eight strategies talked about earlier. However first, think about using 4DDiG Information Restoration, a dependable answer for recovering your knowledge, irrespective of the drive’s situation, with none losses. With the power to recuperate 2000+ file sorts, together with movies, audio, photographs, paperwork, and archives, this device ensures your information are at all times safe.